If you’re not already using a large format printer, you probably will be as your sign business grows. One of the biggest challenges in the transition from vinyl graphics to digital printing is color management. Even most shop owners who already have printers feel like they need to do a better job managing color. This is partly why MUTOH recently hosted a webinar about color management webinar about Soft-proofing. We sat in on the reseller session and thought we’d share a few highlights and take-aways here.
The MUTOH soft-proofing webinar revealed the importance of input profiles and embedded profiles in particular. We usually think of ICC profiles in terms of output. But being mindful of input profiles can solve a lot of riddles. Here are the highlights
Input and Output Profiles
ICC profiles: ICC profiles are a method developed by the International Color Consortium to help standardize color in digital workspaces. These files are used by all RIP software to help produce consistent and correct color from all kinds of digital devices including monitors, scanners, digital cameras, and of course digital printers. A good color management workflow tries to harmonize the input and output profiles to produce consistent, correct color.
Output Profiles: Output profiles are the ones most sign makers use most. These allow your RIP software to manage the performance of your printer by harmonizing the unique aspects of the printer, ink, and media. You can read more about those here.
Input profiles: Input profiles are intended to standardize color on the front end of a digital workflow. These are normally associated with CCD* instruments like scanners and cameras, but also include monitors. The input profile quantifies the characteristics of devices in the RGB color space that produce the images we eventually edit or print. The importance of input profiles is a topic most of us tend to overlook. So naturally, that’s the focus of this article.
Why do input profiles matter? Just as output profiles manage the specific attributes of your printer, ink, and media, input profiles make assumptions about the device that created the image on the other end. All these digital devices try to approximate the colors we see all around us. CCD devices convert those color into pixels. Your printer converts those pixels into ink droplets on media. Ideally, if you were to print a reproduction of a painting from a digital photo, the color from your printer would match the color of the original painting. Your RIP software has to manage that conversion. It does this by proper management of input profiles.
Monitor Profiles
The digital device that gets the least amount of attention in most sign makers’ workflow is the monitor. But the monitor is a critical element that must be managed properly. You may have heard the old adage, ‘garbage in, garbage out’. This usually refers to the axiom that you can’t take a low-resolution jpeg from a web page and turn it into a high-resolution print on a 4 x 8 banner. There’s not enough digital information in that jpeg to produce a good, large, high-resolution print. But, using an uncalibrated monitor, or using a good one in poor lighting conditions, is just as silly because you’re designing graphics based on incorrect color. Garbage in, garbage out. To fix this, you need to calibrate your monitor if possible and use it in well-lit work space.
Monitor calibration: Monitors also use ICC profiles. A good monitor can be calibrated using a spectrophotometer such as an X-rite Eye-One. Calibrating your monitor ensures that what you see will be as accurate as possible. This is essential for good graphic design. If you don’t have a color measurement device you can use to calibrate your monitor, the next best thing is to see if there is an existing ICC profile for it. If you’re designing in LXI RIP Design, LXI Master Plus or FlexiSign, you can specify a profile for your monitor in the Color Settings menu (FIG 1). If you don’t have one installed, you may be able to find one online. After you have your monitor, or monitors calibrated, it goes without saying you should be careful about letting people fiddle with the brightness and color settings.

Soft Proofing & Embedded Input Profiles
Some graphic elements, including customer-supplied images created in other design applications, may have embedded input profiles. Tools for managing embedded profiles are commonly found in all graphic design suites, including Adobe Illustrator, Photoshop, and CorelDRAW. You need to know where to find them and how to disable them. Failing to do so can cause frustrating color shifts in your output.
If you are creating artwork in any of these design suites, try to manage the input profiles to create the most harmony with your output device. Choose settings that are consistent with what your printer, ink, and media will produce. This will reduce the amount of variance in the workflow and allow you to see a more accurate approximation of the final print while you’re still in the design phase. This process is referred to as ‘soft proofing’ and is the actual topic of the recent MUTOH webinar.
There are a few important caveats here. Please bear in mind that, even if your monitor is properly calibrated, and you use the correct input profiles, soft proofing will not always give you an accurate presentation of what comes off the printer. This is because your monitor works in the RGB color space and your printer uses CMYK. As our Basic Guide to Color Space shows in more detail, these color spaces are not completely harmonious. You may have colors in your design that your monitor displays perfectly but your printer cannot reproduce. With that caveat in mind, here are some helpful tips for managing input profiles in Photoshop and LXI or FlexiSign.
Color Settings in Photoshop
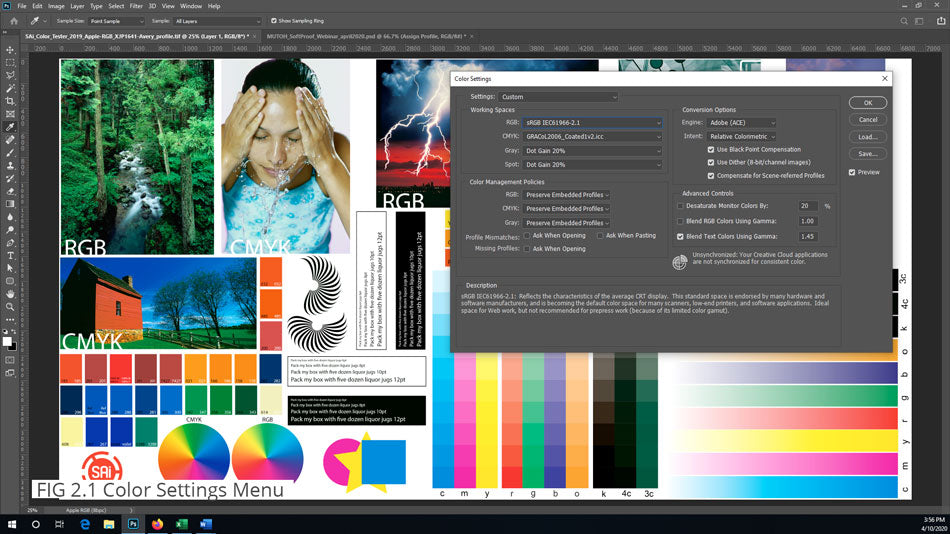
Photoshop Working Spaces: When designing in Photoshop, you can set the input profiles as you create graphics. From the Edit Menu, click on Color Settings. In the Color Settings window, you will see a sub-menu called Working Spaces. Use this menu to specify your input profiles (FIG 2.1). The recommended settings for output to Flexi and LXI are:
- RGB: sRGB IEC61966-2.1
- CMYK: GRACoL2006_Coated1v2.icc
- Gray: GRACoL2006_Coated1v2.icc
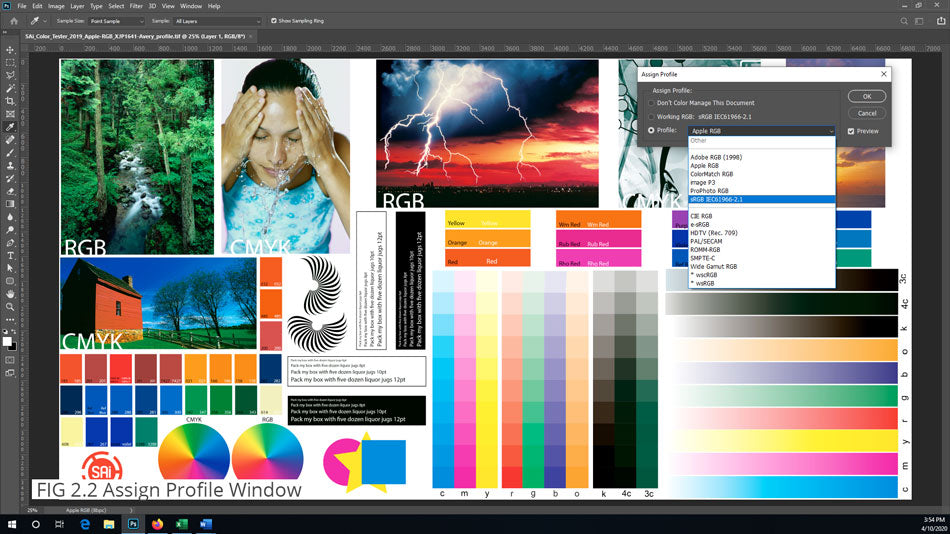
Photoshop: Assign Profile: The next setting you should check in Photoshop is also in the Edit menu, right below Color Settings. Click Edit/Assign Profile (FIG 2.2). This setting allows you to define the input RGB color space. This choice can have a dramatic effect on the color you see as you design the graphic. This in turn, affects your ability to soft proof your work. The recommended setting for the Profile window here is also sRGB IEC61966-2.1. If you’d like to see how drastically this setting affects your display, start with the default profile, then switch it to Apple RGB and CIE RGB. You will see a noticeable difference in saturation. Forgive the jargon, but, if you start with CIE RGB, you will most definitely not be in a WYSIWYG** situation (FIG 2.3, 2.4).
Managing Input Profiles in Flexi & LXI
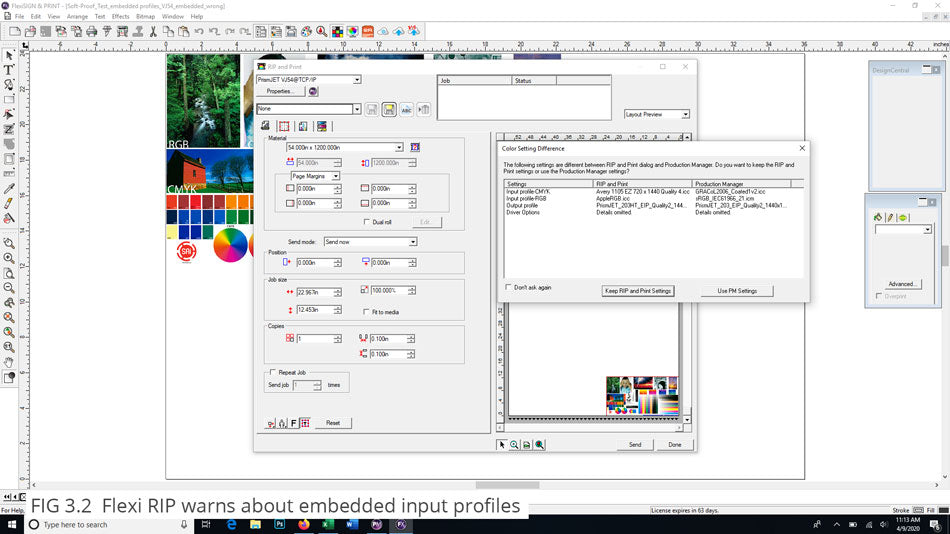
If you’re using some other designer’s work and don’t have the option to set the correct input profiles, you can still manage them in Flexi and LXI. If there are embedded input profiles in your supplied artwork, these can interfere with the work of the RIP engine and affect both the color you see in your design environment, and on your printer. The key is knowing how to find them and turn them off. Fortunately, the process is very similar.
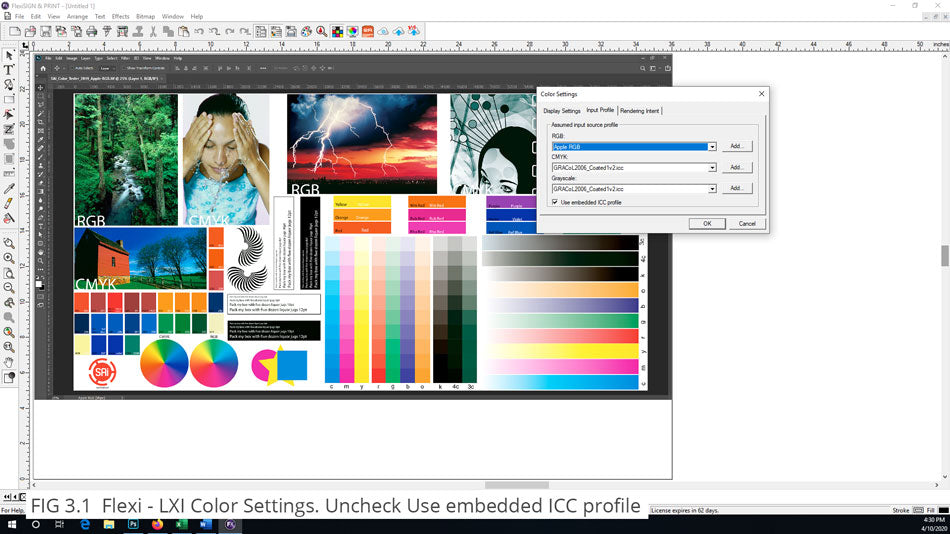
- In Flexi or LXI Master Plus or LXI RIP Design, click the Edit menu, and, from the drop-down menu, select Color Settings.
- In the Color Settings window, click the Input profiles tab. At the bottom of the tab, there is an option to keep embedded ICC profiles. To give the SAI RIP engine the best chance to optimize your output, uncheck the embedded ICC profiles box (FIG 3.1).
Test Prints and Other Tips
The MUTOH Soft-proofing webinar offered other tips to help produce consistent output. We mentioned that your monitor should be in a well-lit space. This also goes for the area in which you view your prints. Viewing your prints in the best possible lighting conditions eliminates errors caused by poor lighting. It can also of course reveal flaws that might be hidden by poor lighting.
If your print is intended to be viewed outside (i.e. on a wrapped vehicle), view the print, or at least an important portion of it - outside before you sign off on the job. This prevents unpleasant surprises due to metamerism. Metamerism is the tendency for some colors to look different under fluorescent light and natural UV light. Sometimes a print looks perfect until its applied to a car and the owner drives it off the lot. Prevent these unpleasant surprises by viewing prints outdoors when necessary
Use a standard test print. If you’re creating profiles in-house or trying to determine the status of your printer, always use a good standard test file. Ideally, it should be one that incorporates a wide range of elements including high resolution raster images, vector elements, target spot colors, and some grayscale elements. We generally use the SAI Color Tester (FIG 2), but, during the MUTOH webinar, Mark offered a wonderful alternative that has large areas for determining neutrality of grayscale output and lots of high resolution raster elements that bring out the best in your high-quality print modes. You can’t download Mark’s test print file from the archived webinar, but we’ve uploaded it here for your convenience.
Soft-proofing is a practice that can make your digital printing workflow more efficient and prevent costly errors. Just keep in mind the differences between the RGB color space of your monitor and the CMYK gamut of your printer. With the monitor in mind, calibrate it if possible, use the best ICC profile, and make sure the settings are correct. When designing in Photoshop, be mindful of the color settings, especially the default color space. All of these steps will give you a clearer view of what the final output looks like while you’re working.
And be aware of how embedded profiles can affect your RIP software. Know how to turn them off when necessary. The best part? All of this is just a summary of what you missed in the MUTOH Soft-proofing webinar. If you’re ready for the rest of Mark Rugen’s color management insights, pour yourself a fresh cup of joe and click here to view the full presentation.
*Charge coupled device
**What You See Is What You Get